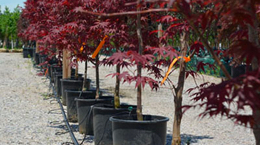
Mugo Pine

Growing zones
See Zone Map >Status: In stock
Please note: #5 containers cannot be shipped to Arizona, California, Idaho, Montana, Nevada, Oregon, Utah, Washington due to size restrictions.
Expand Your Garden with Shrubs from McKay Nursery
Here at McKay Nursery, we have a wide range of aesthetic and functional plants for your landscape design, including dwarf Mugo pine. Our nursery is dedicated to growing hardy and vibrant plants to provide the gardening solutions you need. For extra security on your purchase, we offer a one-year warranty. Order a dwarf Mugo pine now!
For more information, contact us at [email protected] or call us at 920-478-2121.
- Sun
 Mature Plant Size (H x W):
3-5' x 6-10'
Mature Plant Size (H x W):
3-5' x 6-10'
- Attracts Birds
- Deer Resistant
- Winter Interest
- Stone Mulch
Planting & Care for Mugo Pines
Preparation
- A dwarf Mugo pine is a low-growing plant compared to its parent species.
- The Mugo pine grows in acidic, alkaline, loamy, moist, sandy, well-drained, and clay soils. It’s also drought-tolerant, like in urban conditions.
- Full sun and partial shade are best for this tree, which needs at least four hours of sunlight per day.
Opening Plant Material
- B&B: Soak root ball well. Dig a hole at least 6" wider and no deeper than the size of the ball on the plant. Rotate the plant to the proper position. Never lift or move trees by the tops.
- Containers: Completely saturate all container plants by putting them in a larger water container until bubbling stops. Remove the plant, then dig a hole no deeper than the depth of the container, ensuring it’s wider on the sides by an additional 6” or more.
Planting B&B Trees
- Plant B&B trees in spring or fall. A good indicator of whether you can plant is if the ground is still workable. If a hard frost is expected, hold off on planting.
- Notice where the base of the trunk flares out from the tree. This is called the root flare. This root flare should show when the tree is planted. Add soil under the ball so the root flare is exposed if necessary.
- Place fertilizer packets into the bottom of the hole (if purchased). *Use Our Recommended Fertilizer.
- Backfill ½ of the hole with soil and completely saturate the soil with water.
- Once the tree is straight in the proper location, cut and remove twine. Then, remove or bend back the top of the metal basket. Lastly, remove the exposed burlap from the top of the ball.
- Fill the hole to the top of the ball with soil, then soak well with water and let settle.
- The top of the root ball should be visible and slightly higher than the soil around it.
- Add mulch on top of the soil, making sure not to put mulch against the trunk or stems.
Planting Containers
- Dig a hole no deeper than the depth of the container and 6" or wider on the sides.
- Slide the plant from the pot by tapping on the bottom of the pot.
- With a shovel or knife, trim the bottom 2" off the root ball for plants in plastic containers.
- Rotate the plant to the proper position. Never lift or move plants by the tops.
- Place the root ball in the hole.
- Adjust the plant height so the root crown is slightly higher than the ground.
- Notice where the base of the trunk flares out from the tree. This is called the root flare. This root flare should show when the tree is planted. Add soil under the ball so the root flare is exposed if necessary.
- Place fertilizer packets into the bottom of the hole (if purchased). *Use Our Recommended Fertilizer.
- Backfill the hole with soil, ensuring the top of the root ball is visible and slightly higher than the soil around it.
- Firm the soil around the plant. Water well to settle soil around the root ball.
- Check out our Planting & Handling Guide for additional information and illustrations.
Pruning - After Planting
- B&B and Containers: Although it’s not essential after planting, light pruning can help shape a dwarf Mugo pine. Doing so removes any broken branches from shipping or thins out a heavily branched plant to assist in the transplanting process and the appearance of your new planting.
Pruning - Throughout the Season
- Don't trim or prune your Mugo pine in the fall.
- Pines will stop growing from the points where branches are pruned (they do not produce new buds from old wood) if pruned out of season.
- Prune during the spring when the new candle growth begins.
Watering - After Planting
- Plants typically take approximately 6 weeks to establish new roots in your soil. During this period, water plants as often as every 2-4 days at the start and at least a minimum of once per week.
- Beyond the six-week establishment period, water once per week unless rain occurs.
- Remember to check soil moisture by sticking your finger into the soil around 3”.
Watering - Through-out the Season
- After the first season, plants should only be watered during extended periods without rain.
- How do you know if your plants need water? The easiest way to tell is to touch the soil around the roots. If it is moist, there is no need to water. If it’s dry, give it a good soak with the hose end (no nozzle), watering the soil only, not the leaves.
- Same as after planting, stick your finger into the soil around 3” to check soil moisture.
Frequently Asked Questions
What is the best growing zone for dwarf Mugo pine?
Do dwarf Mugo pines need overwintering?
What are the common issues when growing dwarf Mugo pine?
How do you propagate dwarf Mugo pine (Pinus mugo var. Mugo)?
While the dark green needles of your dwarf Mugo pines are still soft, use a sharp knife to cut around 5- to 7-inch long, strong stems from the new growth. Do this in May or June.
Next, trim off any side shoots and remove the needles from the lower part of the stems, ensuring no needles are buried in the soil. This may require stripping a sufficient number of needles.
Prepare 4-inch pots with potting mix. Apply rooting hormone to the cut ends of the stems. Use a pencil or stick to create a hole in the soil, then insert the cutting. Thoroughly water the soil until it is uniformly moist.
Place the pots in an outdoor area where they will receive bright, indirect sunlight and be protected from intense midday sun. Keep the soil consistently moist, but avoid waterlogging. Rooting may take up to two months.
Once the cuttings have rooted, transfer them to larger individual pots. Let them grow in these pots for a few seasons. The stronger the plants are before being moved to the landscape, the more likely they will thrive.
How do I remove worms eating the needles of my Mugo pine (Pinus mugo var. Mugo)?
Planting & Handling Help
Download our Planting and Handling Guide below to plan for a successful arrival and install of your plants. Be sure to water all plants as soon as they arrive and every day until you’re ready to plant. Keep any bare root bundles in a shady, cool spot with the roots covered at all times.

Learn More
Watch our videos on handling bare root plants, how your order is prepared for shipment and more.
Plant Sizing
What is the difference between Containers, Grow Bags, Bare Root, and Balled & Burlap (B&B)?
Shipping Times
Our FedEx and local shipping times depend on two factors, one is by the region and the second is the type of product being shipped. For example, small fruits are only shipped in spring, but majority of our perennials are shipped from spring until fall. Keep in mind the dates below act as a general guide. Due to unpredictable weather, staffing, inventory and industry demands these timelines can change. Therefore, we cannot guarantee any of these times.
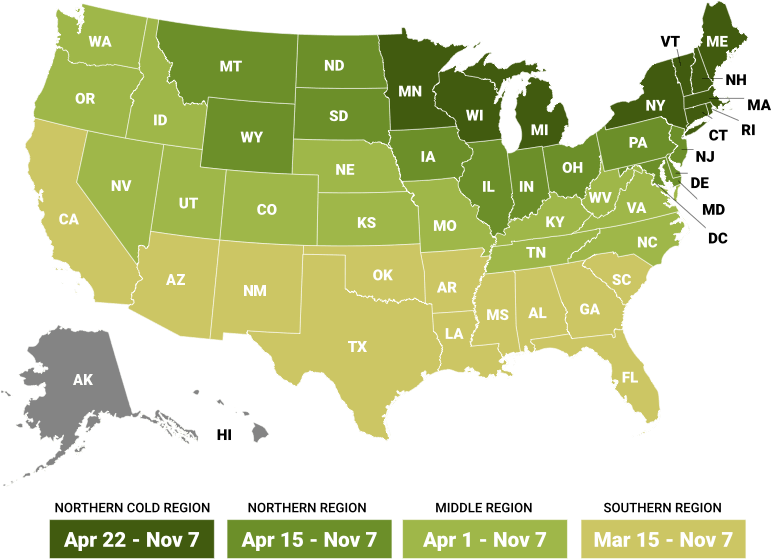
Shipping Dates by Region*
Northern Cold Region: April 22nd - November 7th
Northern Region: April 15th - November 7th
Middle Region: April 1st - November 7th
Southern Region: March 15th - November 7th
Local Delivery (small radius from Waterloo, WI): April 22nd - November 7th
Shipping Dates by Season*
Spring Shipping: Region Start Date (above) - May
Fall Shipping: September - November
Due to unpredictable weather, these times may vary. Some varieties are exceptions due to heat and plant health reasons. Enter your shipping zip code at the top of this page and be sure to check the shipping information on each product before you add it to your cart. If the product is too large or restricted in your state, you will not be able to checkout with that item in your cart.