Common White Lilac

Growing zones
See Zone Map >Status: Out of stock
- Sun
 Mature Plant Size (H x W):
10-12' x 10-12'
Mature Plant Size (H x W):
10-12' x 10-12'  Bloom Season:
Spring
Bloom Season:
Spring
- Attracts Bees
- Deer Resistant
- Salt Tolerant
- Stone Mulch
- Attracts Butterflies
- Cut Flower
- Hedges & Screens
- Fragrant Flowers
- Attracts Pollinators
Planting & Care for Deciduous Shrub – Common White Lilac Flower Bush
Preparation
- Lilac flowers best in full sun but tolerates light shade.
- Choose an open site, protected from strong, drying winds, where air circulates freely, to reduce risk of leaves becoming mildewed.
- These shrubs need well-drained, organically rich soil.
- Avoid chalky spots, which may cause lime-induced chlorosis, when leaves turn creamy yellow and die.
- Plant Lilacs March-November
Opening Plant Material
- Bare Root - Cut open the bundle (top and roots are tied) and separate all the plants. Soak roots in buckets of water until planted. Each plant type will be labeled separately for identification. Do not expose the roots to sun. They should never dry out. Keep roots covered. All bare-root plants must be trimmed when planted.
- B&B - Soak root ball very well. Dig a hole at least 6" wider and no deeper than the size of the ball on the plant. Rotate the plant to the proper position. Never lift or move trees by the tops.
- Containers - Completely saturate all container plants by putting in a larger container of water until stops bubbling, remove. Now ready to plant. Dig a hole no deeper than the depth of the container and 6" or more, making sure it’s wider on the sides.
Planting Bare Root
- Plant Bare root in fall. A good indicator if you can still plant is if the ground is still workable you’re good to go. If a hard frost is expected be sure to hold off on planting.
- Dig a hole at least 6" wider and the same depth as the root mass. The crown or graft of the plant should be slightly higher than ground level where it was grown at the nursery.
- Trim off the broken roots and branches.
- Place fertilizer packets in hole (if purchased). Do not place other fertilizers in the planting hole. *Use Our Recommended Fertilizer.
- Spread the roots and fill halfway with soil, then water until soil settles completely saturating the soil and planting pit.
- Re-adjust plant and fill the hole with the rest of the soil.
- Back fill the balance of the soil and water well.
- See our link below “Handling & Planting Guidelines” for illustrations on planting.
Planting B&B trees
- Plant B&B trees in spring or fall. A good indicator if you can still plant is if the ground is still workable you’re good to go. If a hard frost is expected be sure to hold off on planting.
- Notice where the base of the trunk flairs out from the tree. This is called the root flair. This root flair should show when the tree is planted. If necessary, add soil under the ball so the root flair is exposed.
- Place fertilizer packets into the bottom of the hole (if purchased). *Use Our Recommended Fertilizer
- Backfill ½ of the hole with soil and completely saturate the soil with water.
- Once the tree is straight and located as desired, cut and remove twine. Then, remove or bend back top ? of metal basket. Lastly, remove exposed burlap from top of ball
- Fill the hole to the top of the ball with soil, then soak well with water and let settle.
- The top of the root ball should be visible and slightly higher than the soil around it.
- Add mulch on top of soil making sure to not put mulch against the trunk or stems.
- See our link below “Handling & Planting Guidelines” for illustrations on planting.
Planting containers
- Slide plant from pot by tapping on the bottom of the pot.
- With shovel or knife trim bottom 2" off of the root ball for plants in plastic containers.
- Rotate the plant to the proper position. Never lift or move plants by the tops.
- Place the root ball in the hole.
- Notice where the base of the trunk flairs out from the tree. This is called the root flair. This root flair should show when the tree is planted. If necessary, add soil under the ball so the root flair is exposed.
- Place fertilizer packets into the bottom of the hole (if purchased). *Use Our Recommended Fertilizer.
- Backfill the hole with soil, making sure the top of the root ball is visible and slightly higher than the soil around it.
- Firm the soil around the plant. Water well to settle soil around the root ball.
Pruning - After Planting
- Bare Root - Prune ALL bare root plants to reduce transplant shock and ensure success. Pruning should occur either before or as soon after planting as possible. All pruning should be done with a sharp pruning shears.
- B&B & containers - Although it is not essential for B&B or containers to be pruned after planting, a light pruning for shape, to remove any broken branches from shipping, or to thin out a heavily branched plant will help in the transplanting process and in the appearance of your new planting.
- Groundcovers/Vines – no pruning is needed right away.
Pruning - Through-out the Season
- Prune in November & December – Cut out spent flowers when petals fade. Keep bushes youthful and blooming freely by pruning out a quarter of the older shoots each year in winter. Remove basal suckers.
Watering - After Planting
- Plants typically take approximately 6 weeks to establish new roots in your soil. During this period, water plants as often as every 2-4 days at the start and at least a minimum of once per week.
- Beyond the 6 week establishment period, water once per week, unless rains occur.
- Stick your finger into the soil around 3” to check soil moisture.
Watering - Through-out the Season
- After the first season, plants should only be watered during extended periods without rain.
- How do you know if your plants need water? The easiest way to tell is to touch the soil around the roots. If it is moist, there is no need to water. If it is dry, give it a good soaking with the hose end (no nozzle) watering the soil only, not the leaves.
- Stick your finger into the soil around 3” to check soil moisture.
Planting & Handling Help
Download our Planting and Handling Guide below to plan for a successful arrival and install of your plants. Be sure to water all plants as soon as they arrive and every day until you’re ready to plant. Keep any bare root bundles in a shady, cool spot with the roots covered at all times.

Learn More
Watch our videos on handling bare root plants, how your order is prepared for shipment and more.
Plant Sizing
What is the difference between Containers, Grow Bags, Bare Root, and Balled & Burlap (B&B)?
Shipping Times
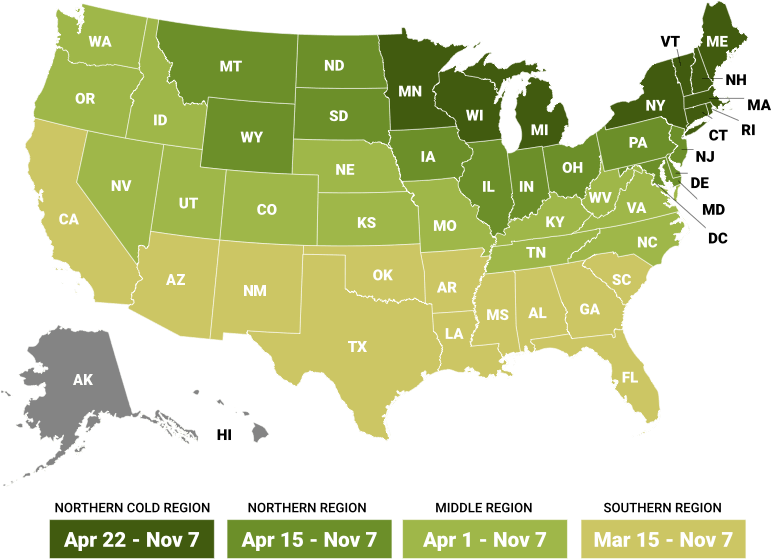
Our FedEx and local shipping times depend on two factors, one is by the region and the second is the type of product being shipped. For example, small fruits are only shipped in spring, but majority of our perennials are shipped from spring until fall. Keep in mind the dates below act as a general guide. Due to unpredictable weather, staffing, inventory and industry demands these timelines can change. Therefore, we cannot guarantee any of these times.
Shipping Dates by Region*
Northern Cold Region: April 22nd - November 7th
Northern Region: April 15th - November 7th
Middle Region: April 1st - November 7th
Southern Region: March 15th - November 7th
Local Delivery (small radius from Waterloo, WI): April 22nd - November 7th
Shipping Dates by Season*
Spring Shipping: Region Start Date (above) - May
Fall Shipping: September - November
Due to unpredictable weather, these times may vary. Some varieties are exceptions due to heat and plant health reasons. Enter your shipping zip code at the top of this page and be sure to check the shipping information on each product before you add it to your cart. If the product is too large or restricted in your state, you will not be able to checkout with that item in your cart.